Prerequisites
You should already have:
- Added a Data Store and tags to groov, so you have your tag id.
- Set up an API user, so you have your API key.
or, to use the View API with groov EPIC:
Build your URL
For this example, we’ll use the Data Store API’s “list all tags” endpoint, located at
/api/v1/data-store/tags.
The URL you query is the web address of your groov (for example, https://my-groov.company.com) along with the API endpoint. Using that example address, our complete URL is:
https://my-groov.company.com/api/v1/data-store/tags
To make your request, you use a client (the API user you added in groov Build) and provide the user’s API key.
The easiest way to provide it is to just append it to your URL as an additional
query parameter named api_key. So using that “list all tags” endpoint, your URL becomes:
https://my-groov.company.com/api/v1/data-store/tags?api_key=MY_API_KEY
Also see Using authorization headers
On Windows
You can use cURL to send API requests. Install Curl. It’s a lightweight command-line tool that lets you make HTTP requests without a web browser. You can try out API requests in your command prompt without having to build a working web application.
cURL makes HTTP requests just like a web browser, and the web server’s response appears directly in your command-line interface. Here’s your cURL request for the “list all tags” endpoint:
$ curl -X GET --header 'Accept: application/json' 'https://my-groov.company.com/api/v1/data-store/tags?api_key=MY_API_KEY'
Your response in the command-line interface would be something like this:
[ {
  "id": 77,
  "deviceId": 7,
  "name": "Part #",
  "dataType": "string"
}, {
  "id": 79,
  "deviceId": 7,
  "name": "Quantity",
  "dataType": "integer"
} ]
Here you have one Data Store with two tags in your groov project. You can see the id of the Data Store device, the tag ids (which you’ll need for queries), user-friendly tag names, and data types of the tags.
On Linux or OSX
On a Unix-like system, such as Linux and OSX, you’ll probably have cURL available, and making a request using it is as simple as:
$ curl -k 'https://my-groov.company.com/api/v1/data-store/tags?api_key=MY_API_KEY'
A couple of quick notes on using cURL to make requests:
- Most groov instances use self-signed SSL certificates, which cURL will refuse to connect
to by default. The
-koption tells cURL to allow the request using an unknown certificate. - It’s good practice to wrap your request URL in single-quote marks (‘): otherwise the ? and & symbols in your URL will probably confuse your shell.
A full example from a local groov instance looks like this:
localhost:~ user$ curl -k 'https://my-groov.company.com/api/v1/data-store/tags?api_key=nmLtALRF7Rqu2MJ9crid6c3Nu5KxqQTG'
[ {
  "id" : 12,
  "deviceId" : 2,
  "name" : "my-boolean",
  "dataType" : "boolean"
}, {
  "id" : 13,
  "deviceId" : 2,
  "name" : "my-integer",
  "dataType" : "integer"
}, {
  "id" : 14,
  "deviceId" : 2,
  "name" : "my-float",
  "dataType" : "float"
}, {
  "id" : 15,
  "deviceId" : 2,
  "name" : "my-string",
  "dataType" : "float"
} ]

localhost:~ user$
There are four Data Store tags in this project, and the endpoint returns their tag ids (needed for queries), user-friendly names, data types, and the id of the Data Store device they belong to.
More request examples
If you’re in groov Build, you can see many more URL and cURL examples for your own groov project.
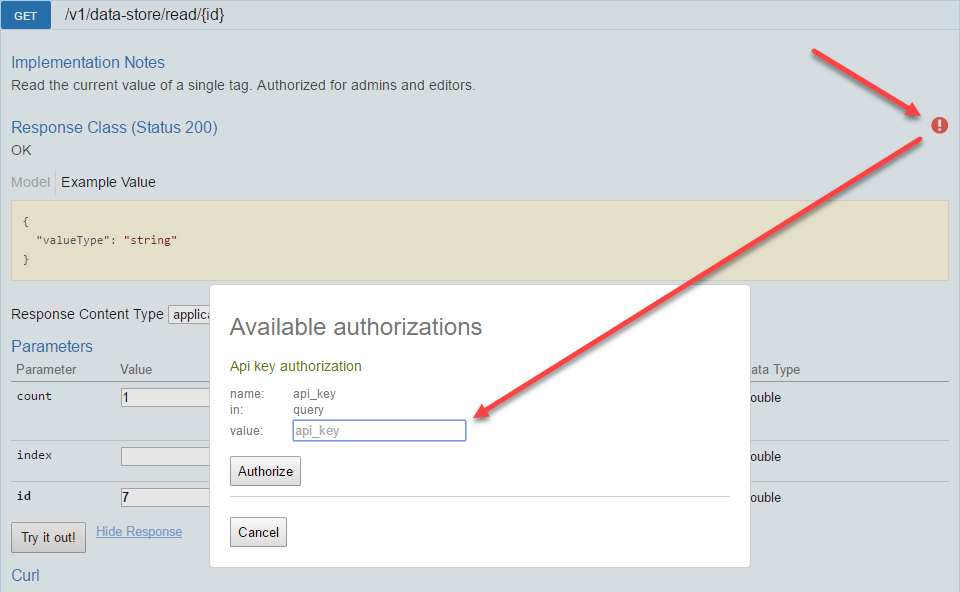
Choose Help > groov Public API and try the examples from the API page. Just click the Try it out! button for the endpoint. (These buttons are available when you view the page from groov Build, but not from the API Reference page here on the developer site.)
Since you are already authenticated in groov Build, you can read without having to enter your API key. To write, click the red exclamation mark and enter your API key in the dialog box:
For groov EPIC, see the specific instructions for that device.
Using Tag IDs
When you add a groov Data Store and its tags, each tag is assigned a tag id. Many API requests require the tag id, which appears as a parameter for the endpoint. For example, the Data Store API’s “read a single tag’s value” endpoint is
/api/v1/data-store/read/<tag-id>
If you have a single-value tag with an id of 77, the URL to read that value is:
https://my-groov.company.com/api/v1/data-store/read/77?api_key=MY_API_KEY
The response might look something like this:
[ {
 "id": 77,
 "valueType": "stringValue",
 "value": "ABC45"
} ]
You see your tag id, the type of data, and the current value for the tag.
Writing. Writing to a tag is similar; the value to be written is another parameter. For example, the Data Store API’s “write a single tag’s value” endpoint is
/api/v1/data-store/write/<tag id>?<value>
So your request URL is:
https://my-groov.company.com/api/v1/data-store/write/79?value=20&api_key=MY_API_KEY
And the response would be something like this:
[ {
 "id": 79,
 "valueType": "integerValue",
 "value": 20
} ]
You see the tag id, its data type, and the value you wrote.
Using tables
Suppose you want to read tags in a table. Again let’s use the endpoint of
/api/v1/data-store/read/<tag-id>?index=<table-index>&count=<table-count>
This time you’ll use the optional index and count query parameters. If you have a table tag with id 80, and you want to read 4 elements from it starting at index 3, your URL is:
https://my-groov.company.com/api/v1/data-store/read/80?count=4&index=3&api_key=MY_API_KEY
NOTE: If you’re reading a table tag and you don’t provide the index or count parameters, they default to 0 and 1, respectively.
Your response might look like this:
[ {
  "id": 80,
  "valueType": "stringArrayValue",
  "value": [
    "AB450",
    "AC230",
    "AA670",
    "AT540"
  ]
} ]
The four values you requested are shown in order. Index 3 = AB450, index 4 = AC230, and so on.
Writing. Writing to a table is similar, except you write to one element at a time. Here’s the request:
https://my-groov.company.com/api/v1/data-store/write/80?index=7&value=AR950&api_key=MY_API_KEY
And here’s the response:
[ {
 "id": 80,
 "valueType": "stringArrayValue",
 "value": "AR950"
} ]
The response verifies that at index 7 in this table, you’ve written the value AR950.
Next Step
If needed, see: