Overview
The following steps will have you setting up your Read Temp, Format Data, and Append Data nodes from the previously imported flow.
Step 1 - Configure the groov I/O device
- Double-click the groov I/O Read Temp node to open the “Edit groov i/o read node” view. If this is the first groov I/O node, a groov device configuration must be added.
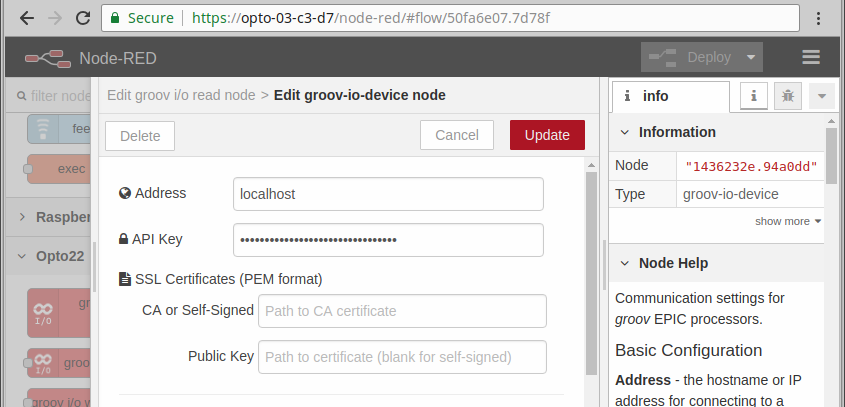
- Click the pencil icon to the right of the Device field to open the “Edit groov-io-device node” view.
- For the Address field, enter the hostname or IP address of the groov I/O device.
- If using Node-RED and groov I/O on the same device (such as a groov EPIC processor), then enter “localhost” for the address.
- Do not include HTTPS:// as a part of the address.
- For the API Key field, enter a valid API key for a user on the groov I/O device. This can be found in the Accounts section of groov Manage on the device.
-
Configure the SSL Certificates fields.
Note: This step should be skipped if you’re using groov I/O and Node-RED on the same device or computer, such as a groov EPIC processor. In that case, make sure you’re using “localhost” for groov’s address and do not enter anything for the certificates.If the groov I/O and Node-RED are on different devices, then you must configure Node-RED to use the groov device’s public key SSL certificate.
Important: The certificate files need to be on the same groov device or the same computer as the Node-RED installation, as it will open the certificate file directly from the file system.- If using a self-signed certificate, then enter the certificate’s filename or full path in the “CA or Self-Signed” field.
- If using a groov EPIC processor or groov Edge Appliance, just enter the filename of a certificate you uploaded using groov Manage or Node-RED Admin.
- If using Node-RED on a computer, enter the path and filename of a certificate on the same computer.
- If using a CA-signed certificate, then enter the CA certificate’s filename or full path in the “CA or Self-Signed” field and groov’s public key in the “Public Key” field.
- If using a groov EPIC processor or groov Edge Appliance, just enter the filenames of the certificates you uploaded using groov Manage or Node-RED Admin.
- If using Node-RED on a computer, enter the path and filenames of the certificates on the same computer.
- If using a self-signed certificate, then enter the certificate’s filename or full path in the “CA or Self-Signed” field.
- Click Done to return to the “Edit groov i/o read node” view.
Step 2 - Configure the “Read Temp” Read node
This step will read from an ICTD that returns temperature to keep things simple.
With the “Edit groov i/o read node” view still open:
- For the Data Type field, select Analog Channel.
- For the Module Index and Channel Index, enter the ITCD point information.
- Leave the Value field. msg.payload selected.
- Leave the Name field, Read Temp.
- Click Done.
Step 3 - Configure the “Format Data” Node
- Format data using the provided Function Node.
Example of the formatting:
msg.payload = [ new Date(msg.payload).toLocaleString(), msg.temp.toFixed(2) ]; return msg;
Each index of the above JSON array is a new column of data in a single row. A comma (,) separates the fields/elements in JSON.
Step 4 - Configure the “Append Data” Google Sheet Node
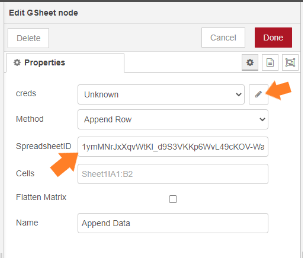
- Double-click the “Append Data” Google Sheet Node.
- Click the pencil icon next to the creds input field.
- Open the file you downloaded from the Google API website and copy and paste it into this new window.
- Click Update
- In your browser, copy the ID part from the HTTPS URL of the spreadsheet. The link looks similar to this: “https://docs.google.com/spreadsheets/d/1ymMNrJxXqvWtKl_d9S3VKKp6WvL49cKOV-Waz_iQge8/edit#gid=0”. In this example, the ID is “1ymMNrJxXqvWtKl_d9S3VKKp6WvL49cKOV-Waz_iQge8”.
- Paste into the SpreadsheetID field.
- Click Done.

In the example given, the ID is 1ymMNrJxXqvWtKl_d9S3VKKp6WvL49cKOV-Waz_iQge8
Step 5 - Deploy
- Deploy your flow from the top right.
- Click the Inject node to inject manually.
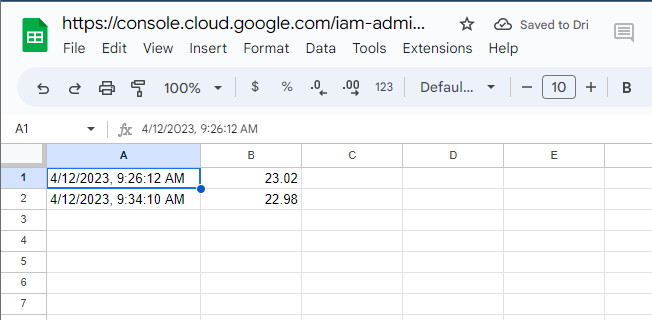
- Your spreadsheet should have a new row indicating the Date/Time and temperature.
Additional Methods
In addition to the Append Row method, Google Sheets API also provides several other methods for working with spreadsheet data. These methods include Get Cells, Update Cells, and Clear Cells.
Each of these methods can be used in combination with Node-RED and groov I/O to create powerful integrations between your physical devices and Google Sheets.
Conclusion
Congratulations! You’ve successfully integrated groov I/O with Google Sheets using Node-RED. By following this tutorial, you’ve learned how to extract temperature data from a groov I/O ICTD channel and publish it to a Google Sheets spreadsheet using the Append Row method.
This is just the beginning of what you can accomplish with Node-RED and groov I/O. With the help of the many available nodes and integrations, you can connect your devices to a wide range of online services and build powerful automation workflows.
If you want to learn more, be sure to check out the Google Sheets API documentation for additional information and documentation. You can also explore the node-red-contrib-google-sheets homepage for more details on the various methods and functionality available.
Thanks for following along with this tutorial, and happy integrating!
Previous Step
Return to Creating an API with Google.