Opto 22’s SNAP PAC REST API provides read-only and read-write access to the data in PAC Control strategies running on your SNAP PAC R-series or S-series controllers. Secure access to your controller is ensured by the use of HTTPS and Basic Authentication.
Prerequisites
- SNAP PAC R-series or S-series controller with firmware R9.5a or higher.
- PAC Manager R9.5a or higher (to configure the HTTP/HTTPS server in your controller)
- Network access to your SNAP PAC controller
- Browser software
- (HTTPS only) A signed or self-signed TLS/SSL security certificate
Setup
Perform these steps to set up security and user access to the SNAP PAC REST API:
- Step 1: Configure the HTTP/HTTPS server in your controller
- Step 2: Create an administrator username and password
- Step 3: (HTTPS only) Install a security certificate
- Step 4: Add API accounts
Step 1: Configure the HTTP/HTTPS server in your controller
Before you can use the Opto 22 SNAP-PAC REST API, you must configure the HTTP/HTTPS server in your controller.
- In PAC Manager, click Tools > Inspect, or click the Inspect button.
- In the Inspect Opto 22 Device window, enter the IP address for the R- or S-series controller you want to configure, or select it from the list.
- Click the Communications button, and then choose Network Security from the pop-up menu.
- In the WEB SERVER section:
- Change the default value of TCP Listen Port (address 0xFFFF F03A 0014). Typically, port 443 is used for HTTPS, and port 80 is used for HTTP.
- Verify the value of HTTPS (address 0xFFFF F03A 007C).
– For HTTPS, the value should be Enabled.
– For HTTP, change the value to Disabled. - Click Apply to save the changes.

- To immediately enable the HTTP/HTTPS server feature, reboot the controller so that the changes take effect.
- Click Store configuration to flash, and then click Send Command.
- Click Restart Device from powerup, and then click Send Command
Important: Opto 22 strongly recommends using HTTPS for secure, encrypted access to your controller. Use HTTP for testing purposes only.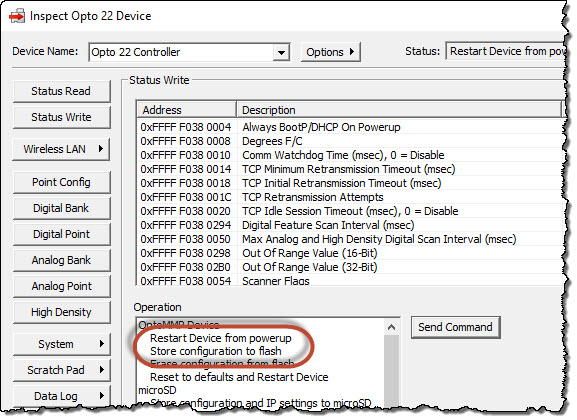
Step 2: Create an administrator username and password
To change the default administrator username and password:
-
In a browser window, call the Credentials API:
https (or http)://<controller IP address>/admin/credsExample: https://10.990.90.920/admin/creds
Note: If your browser displays a security certificate warning (such as Invalid Certificate), ignore the warning and continue to the website. You may need to change your browser’s options to add your PAC controller to the browser’s list of "trusted websites." -
When prompted by the browser, log in with the default username and password:
– Username: admin
– Password: password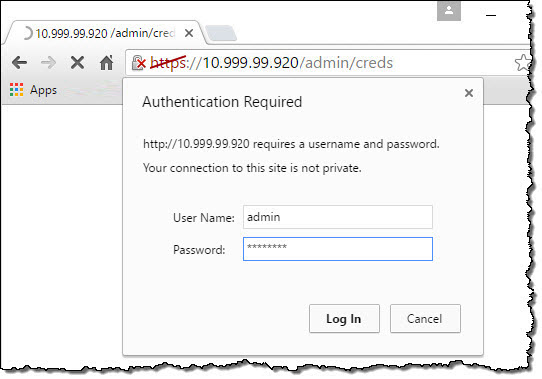
-
On the Administrative Credentials webpage, type a new username and password.
– Usernames and passwords are case-sensitive.
– Username maximum length: 128 characters.
– Password maximum length: 128 characters.
– Username cannot be “admin”; password cannot be “password”. -
Click Submit.
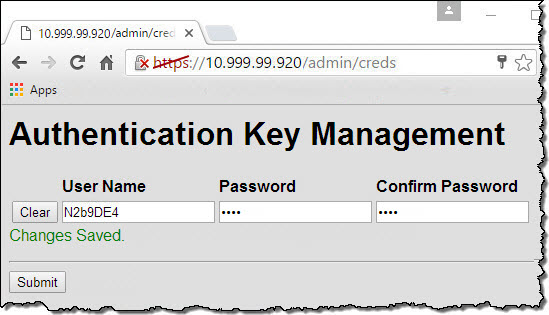
“Changes Saved” indicates that the username and password were changed.
Step 3: (HTTPS only) Install a security certificate
For secure access to SNAP PAC REST API, you must install a security certificate and private key to replace the default certificate and key in the controller.
Requirements
- The private key must use:
– RSA 2048-bit or shorter
– PKCS #1 key structure
m– PEM encoding - The certificate must match the private key and use:
– X.509
– PEM encoding
Tips
- DER-encoded certificates are not supported. To tell if your certificate is DER-encoded, open it in a text editor. DER is a binary format—it’s not human-readable. (In contrast, PEM encoding—which is supported—is human-readable and starts with “—–BEGIN”.)
-
DER-encoded keys are not supported. PKCS #8 keys are not supported. If you upload a key that uses DER or PKCS #8, the upload will appear to succeed, but in reality, the controller will continue to use PAC firmware’s default key and certificate. To tell if your key is PKCS #1, open the key in a text editor. The key uses PKCS #1 only if the prefix reads: —–BEGIN RSA PRIVATE KEY —–
Important: Keep your private key private. It’s like the key to a safe that stores your controller’s data. Don’t share it with external resources and don’t save it on an unsecured computer or network.
If you already have a private key and certificate, see To upload a certificate.
If you don’t have a private key and certificate (or if your certificate doesn’t meet the requirements described in Requirements,) you can use a toolkit such as OpenSSL® to create them. The OpenSSL Software Foundation maintains a list of resources that provide OpenSSL binaries for selected operating systems (https://wiki.openssl.org/index.php/Binaries).
To create a private key and self-signed TLS certificate using OpenSSL
- Install OpenSSL. If necessary, add the path to OpenSSL.exe to your system environment variables.
-
Open a command prompt, and then type the OpenSSL “req” command:
req -nodes -newkey rsa:2048 -keyout <key filename> -out <certificate filename> -x509 -days <number of days for the certificate to be valid>
Example: C:\> openssl req -nodes -newkey rsa:2048 -keyout mykey.key -out mycert.cer -x509 -days 3650
-
When prompted, type the requested information.
Example:
– Country Name (2 letter code): FN
– State or Province Name (full name): N/A
– Locality Name: Florin
– Organization Name: Internet Widgets, LLC
– Organizational Unit Name: IT
– Common Name: Inigo Montoya
– Email Address: inigo@florin.net
OpenSSL creates a certificate and a PKCS #8 key in the current folder. -
To convert the key to PKCS #1, enter the OpenSSL “rsa” command: rsa -in <key filename> -out <key filename>
Example: C:\> openssl rsa -in mykey.key -out mykey.key
You can now upload the certificate and key to your PAC controller.
To upload a private key and certificate
NOTE: Completing this step will automatically reboot the controller.
-
In a browser window, call the Certificates API:
https://<controller IP address>/admin/certsExample: https://10.990.90.920/admin/certs
Before you load a certificate, the status displayed on this webpage is “Not loaded; using default.”
- Log in with the username and password you created in Step 2.
- On the Certificates Administration webpage:
- In the Certificate row, click Choose File, and then select the certificate file.
- In the Key row, click Choose File, and then select the key file.
- Click Submit to copy the certificate and key to the controller.
The controller installs the certificate and key, and then automatically reboots.
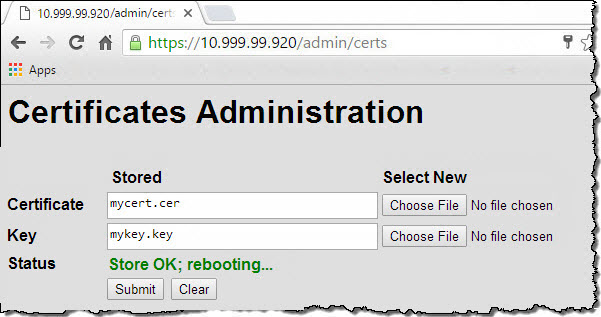
The webpage displays the message, “Store OK; rebooting…,” until you either reopen the browser or press Enter with your cursor in the browser’s Web address field. Don’t refresh the browser; refreshing the browser causes the controller to reboot again. (You can use PAC Manager or look at the LEDs on the controller to know when the reboot is complete.)
The next time you load the Certificates Adminisration webpage, the certificate’s new status (“Loaded Successfully”) is displayed.
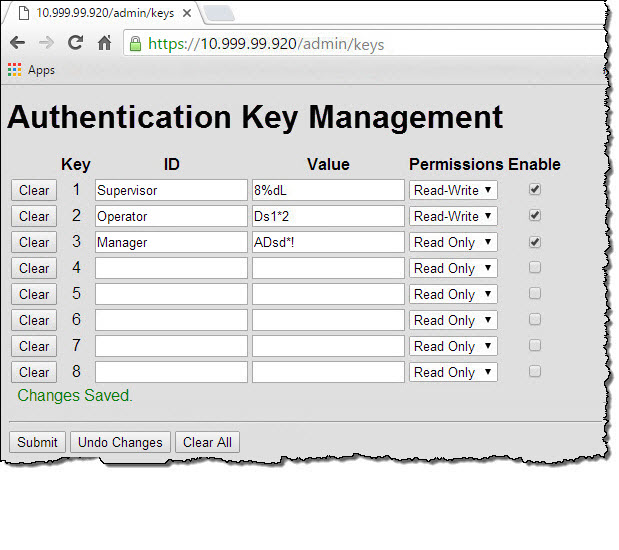
Step 4: Add API keys
SNAP PAC REST API includes an endpoint where you can configure up to 8 API keys. API keys are used to authenticate requests to the SNAP-PAC REST API. In each request, the HTTP Basic Authentication header is populated with the key id in place of the username and the key value in place of the password.
Key values should be long, hard to guess values.
To create API keys
-
In a browser window, call the Keys API:
https://<controller IP address>/admin/keysExample: https://10.990.90.920/admin/keys
- Log in with the username and password you created in Step 2.
- On the Authentication Key Management webpage:
- Type a key identifier in the ID field and a key value in the Value field (maximum length for each: 128 characters). API key values should be long, hard-to-guess strings of characters.
- In the Permissions field, select either Read Only or Read-Write.
- Select Enable to grant access to the API key.
- Click Submit to save the changes.
For a list of operations and examples, see the API Reference Library