Overview
In this first example, we’ll write the string “Hello, world!” to the Scratch Pad area of the OptoMMP memory map.
This example assumes you have basic familiarity with creating and running an application in the CODESYS Development System.
Step 1 - Determine the OptoMMP Address to Use
The “Hello, world!” string will be written to the Scratch Pad String Area. The Scratch Pad is a feature of the I/O services. It’s a convenient and central place for different programs to read and write data.
The correct OptoMMP memory map address must be determined. This can accomplished in two ways.
Method 1 - OptoMMP Protocol Guide
The OptoMMP Protocol Guide (form 1465) contains a full reference for the OptoMMP memory map.
The Scratch Pad area is defined in “Appendix A: SCRATCH PAD—READ/WRITE”.
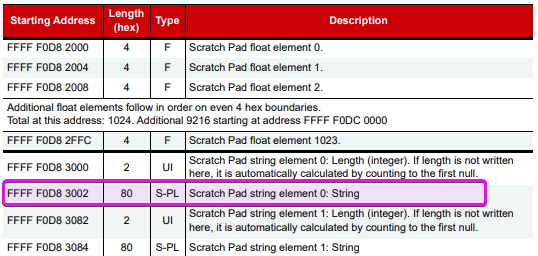
We’ll use element 0, and we need the address of the string data, not the length. According the table, the memory address is 0xF0D83002.
Method 2 - MMP Calculator in groov Manage
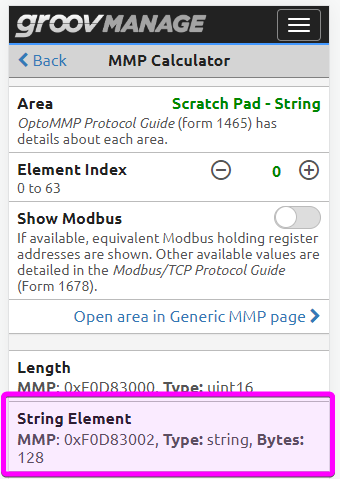
groov Manage on the groov EPIC processors contains a convenient tool called MMP Calculator for finding and calculcating OptoMMP memory map addresses.
- In groov Manage, click Home > I/O > I/O Services > MMP Calculator.
- For Area, select Scratch Pad - String.
- For Element Index, select 0.
Like the document in Method 1, it shows that the Opto MMP memory address is 0xF0D83002.
Step 2 - Add Opto 22 Library
- Create or open an application within the CODESYS Development System.
-
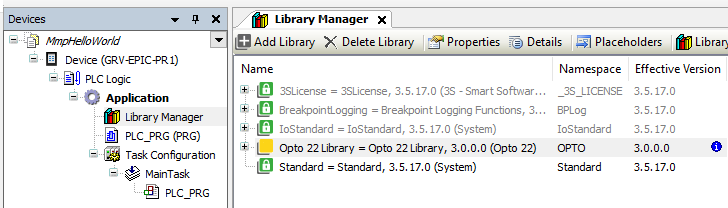
Make sure the Opto 22 Library, version 3.0.0.0 or later, is added to the Library Manager.
Step 3 - Add POU and Variables
This example needs one Program (POU) and three variables.
- Create a new POU named
MMP_HELLO_WORLD_CFCwith Continuous Function Chart (CFC) as the implementation language. - Add the new program to the Task Configuration.
-
Add the following variables to the Declaration area of the
MMP_HELLO_WORLD_CFCprogram.PROGRAM MMP_HELLO_WORLD_CFC VAR sMsg : STRING := 'Hello, world!'; mmpClient: OPTO.MmpClient; mmpClientWriteBlock: OPTO.MmpClientWriteBlock; END_VAR
sMsgis theSTRINGvariable that will be written to OptoMMP Scratch Map.mmpClientis theMmpClientfunction block that will manage the connection and communication with the internal OptoMMP server.-
mmpClientWriteBlockis theMmpClientWriteBlockfunction block that will make the specific Write Block request.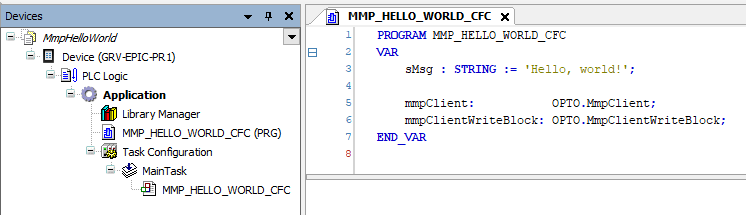
Step 4 - Initialize the MmpClient Instance
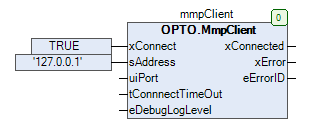
- In the declaration editor, double-click the
mmpClientvariable and drag it into the implementation area. - A few of the inputs need to be set.
- Assign
TRUEtoxConnect. - Assign
'127.0.0.1'tosAddress.
- Assign
-
The other inputs can be left at their default values.
Step 5 - Initialize the MmpClientWriteBlock Instance
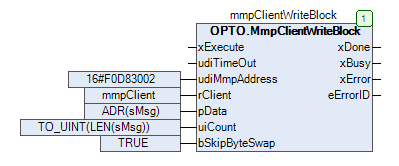
- In the declaration editor, double-click the
mmpClientWriteBlockvariable and drag it into the implementation area. - A few of the inputs need to be set.
- Assign
16#F0D83002toudiMmpAddress.- This is the OptoMMP memory map address that was determined in Step 1.
- Assign
mmpClienttorClient.- This is a reference to the client.
- Assign
ADR(sMsg)topData.pDatais of typePOINTER TO BYTE, and is a pointer to the block of data to be written. In this case, we need the memory address of the string value. TheADRoperator is used to get the address of the string’s content.
- Assign
TO_UINT(LEN(sMsg))touiCount.- The
uiCountinput needs the number of bytes to be written. This can be calculcated with theLEN()funtion.LEN()return aUDINT, which must be converted to aUINTwith theTO_UINToperator.
- The
- Assign
TRUEtobSkipByteSwap.
- Assign
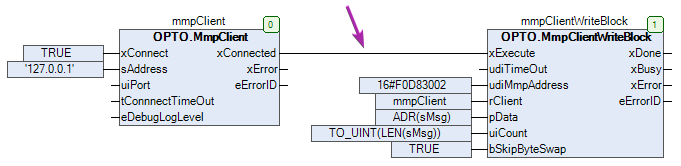
Step 6 - Connect the Function Blocks
This example is very simple. Once the client is connected, the string value will be written one time.
This can be accomplished by simply connecting the xConnected output from the client to the xExecute input of the write request.
Step 7 - Run and View Results
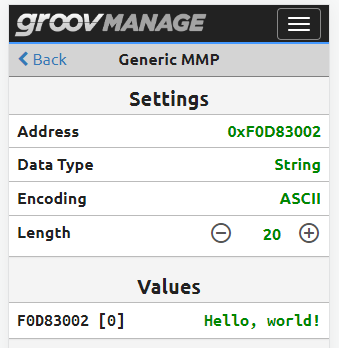
Before running the application, use groov Manage to view the OptoMMP memory map address.
- In groov Manage, navigate to Home > I/O > I/O Services > Generic MMP.
- For Address, enter 0xF0D83002.
- For Data Type, select String.
- For Encoding, select ASCII.
-
For Length, enter 20.

Back in CODESYS:
- Go into Online mode.
- Run the application.
If all goes well, there should be a blue line between the client’s xConnected output and the request block’s xExecute input, and the xDone output should be TRUE.
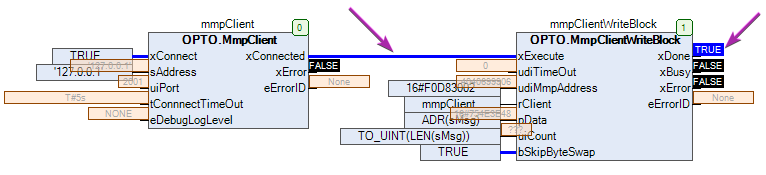
Back in the Generic MMP page in groov Manage, the Scratch Pad string element should show the ‘Hello, world!’ message.
Ladder Logic Version
This example in Ladder Logic (LD) is very similar. Here’s one way it could be written:
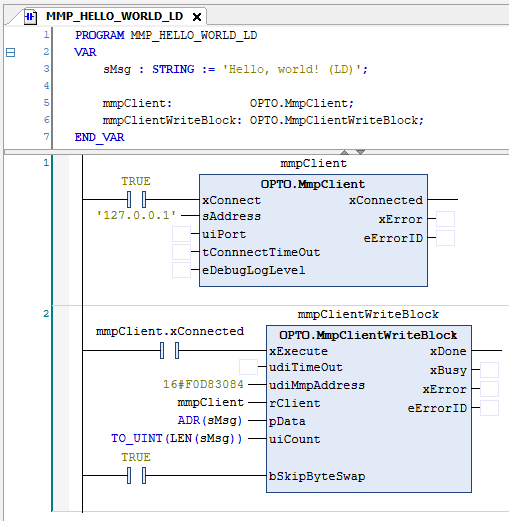
To keep the code clean, two network rungs were used. There’s still a connection between client’s xConnected output and the xExecute input of the write request.
Structured Text Version
This example in Structure Text (ST) is very similar. Here’s one way it could be written:
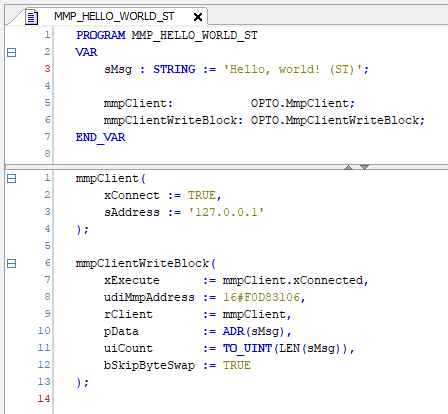
There’s still a connection between client’s xConnected output and the xExecute input of the write request.
Next Step
Continue on to the Writing an Integer example.