Overview
In the previous example, we saw how to read values from a groov I/O analog or digital channel.
The Read and Input nodes are similar, since they both read values from groov I/O.
A Read node only reads when it receives an incoming message. In a very simple flow, the incoming message is often generated from an Inject node that is configured to inject messages at regular intervals.
An Input node scans the I/O and only generates a new message when the value has changed. In many cases, this can be more convenient than using a Read node.
Example
- Drag out an Input node and a Debug node.
- Wire the nodes together.
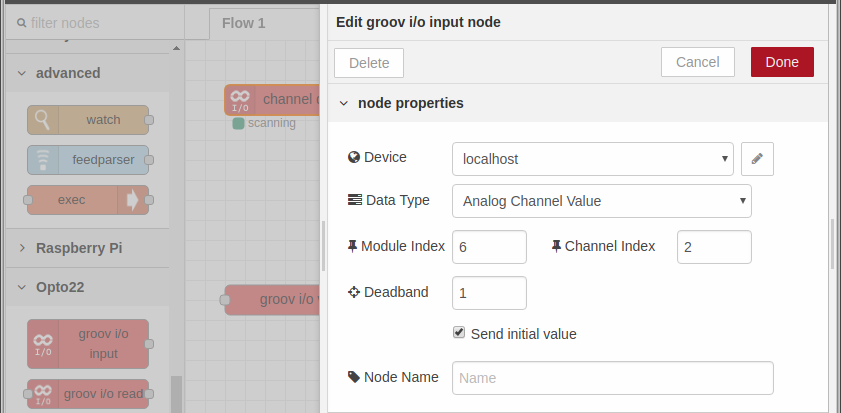
- Double-click on the Input node to open the “Edit groov i/o input node” view.
- For the Device field, confirm that a configured device is selected.
- For the Data Type field, select either Digital State Change or Analog Channel Value, depending upon what type of module you are using.
- For the Module Index, enter the module location you’d like to use. The indexes are zero-based, so 0 is for the first slot on the chassis.
- For the Channel Index, enter the channel you’d like to use. The indexes are zero-based, so 0 is for the first channel on the module.
- Click Done.
- Click Deploy.
In the Debug tab, you should see messages when the channel’s state or value changes.

Options
For digital channels, you can monitor state changes in various ways: * State Change: generates a new message whenever the channel’s state changes. * Turned On and Turned Off: generates a new message only when the channel is turned on or off. * On-Latch and Off-Latch: generates a new message only when an digital input’s latch is set. This would likely be used with a Write node to clear the latch. * Feature Value: generates a new message when a digital input’s feature value changes, such as a counter or measurement.
For numeric values, the Deadband setting controls the generation of new messages. A message is only generated if the new value is beyond the deadband compared to the previous sent value (or the initial value if just starting up).
When the Send initial value option is selected, the node will send a message with the first value. This is useful when needing to capture the current value rather than wait for a value to change before a message is sent.
Next Step
Continue on to writing I/O values.