Overview
If you’re new to Node-RED but have not yet worked through the Hello, world! example, please do so now.
In this section, we’ll add a groov I/O Read node, configure the groov device and address, and run the flow.
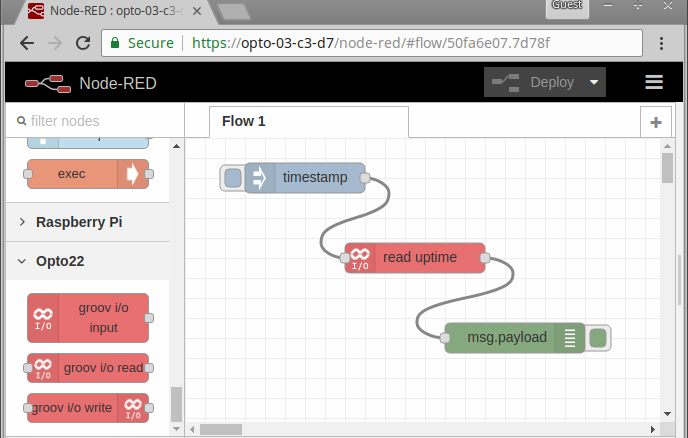
Step 1 - Add a groov I/O Read Node
- Drag out an Inject node, a groov I/O Read node, and a Debug node.
- Wire them together, as shown below.
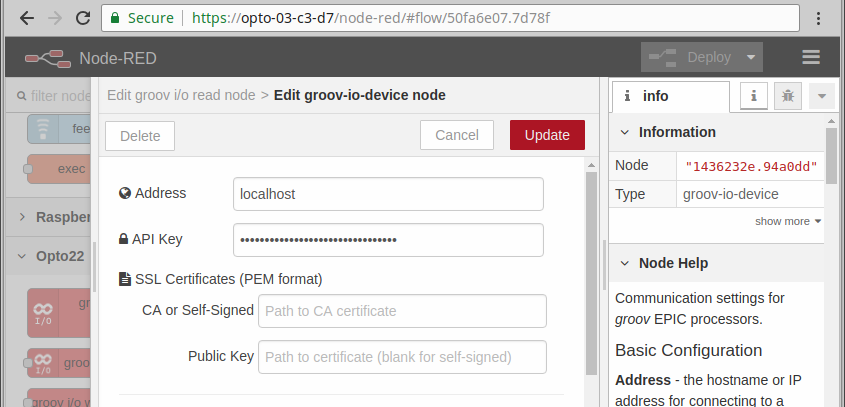
Step 2 - Configure the groov I/O device
- Double-click the groov I/O Read node to open the “Edit groov i/o read node” view. Since this is the first groov I/O node, a groov device configuration must be added.
- Click the pencil icon to the right of the Device field to open the “Edit groov-io-device node” view.
- For the Address field, enter the hostname or IP address of the groov I/O device.
- If using Node-RED and groov I/O on the same device (such as a groov EPIC processor), then enter “localhost” for the address.
- Do not include HTTPS:// as a part of the address.
- For the API Key field, enter a valid API key for a user on the groov I/O device. This can be found in the Accounts section of groov Manage on the device.
-
Configure the SSL Certificates fields.
Note: This step should be skipped if you’re using groov I/O and Node-RED on the same device or computer, such as a groov EPIC processor. In that case, make sure you’re using “localhost” for groov’s address and do not enter anything for the certificates.If the groov I/O and Node-RED are on different devices, then you must configure Node-RED to use the groov device’s public key SSL certificate.
Important: The certificate files need to be on the same groov device or the same computer as the Node-RED installation, as it will open the certificate file directly from the file system.- If using a self-signed certificate, then enter the certificate’s filename or full path in the “CA or Self-Signed” field.
- If using a groov EPIC processor or groov Edge Appliance, just enter the filename of a certificate you uploaded using groov Manage or Node-RED Admin.
- If using Node-RED on a computer, enter the path and filename of a certificate on the same computer.
- If using a CA-signed certificate, then enter the CA’s certificate’s filename or full path in the “CA or Self-Signed” field and groov’s public key in the “Public Key” field.
- If using a groov EPIC processor or groov Edge Appliance, just enter the filenames of the certificates you uploaded using groov Manage or Node-RED Admin.
- If using Node-RED on a computer, enter the path and filenames of the certificates on the same computer.
- If using a self-signed certificate, then enter the certificate’s filename or full path in the “CA or Self-Signed” field.
- Click Done to return to the “Edit groov i/o read node” view.
Step 3 - Configure the Read node
To keep things simple, we’ll read from a memory map address that returns the number of seconds since the device was last powered up.
With the “Edit groov i/o read node” view still open:
- For the Data Type field, select MMP Address.
- For the Address field, enter 0xF0300160.
- For the Type field, select UINT32.
- Leave the Length field empty.
- Leave the Value field. with msg.payload selected.
- For the Name field, enter read uptime.
- Click Done.

Step 4 - Deploy and Run
- Click Deploy.
- Make sure the Debug tab is viewable in the right-hand sidebar.
- Click the Inject node’s button.
- The Debug tab should show a new message with a large number, which is the uptime of the device.
- Click the Inject node again, and the number should be a bit larger.
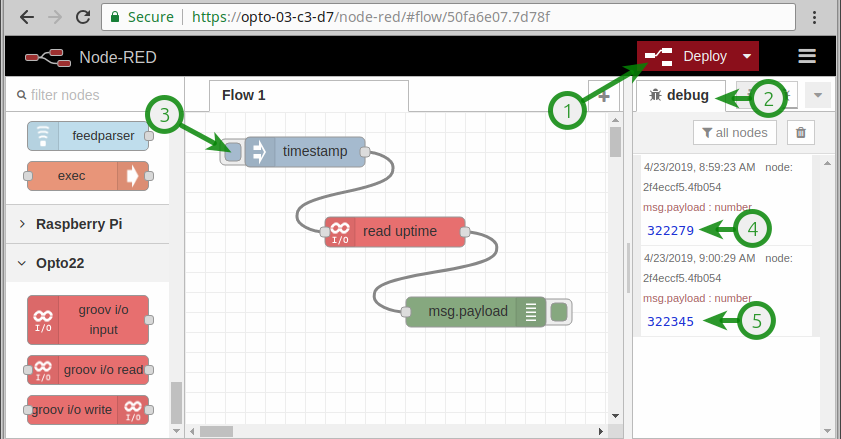
If that worked for you, then your Node-RED installation is successfully communicating with your groov I/O!
Next Step
Continue on to reading a digital or analog channel’s value.