Overview
If you’re new to Node-RED but have not yet worked through the Hello, world! example, please do so now.
In this section, we’ll add a PAC Control Read node, configure the controller’s address, and run the flow.
Step 1 - Add a PAC Control Read Node
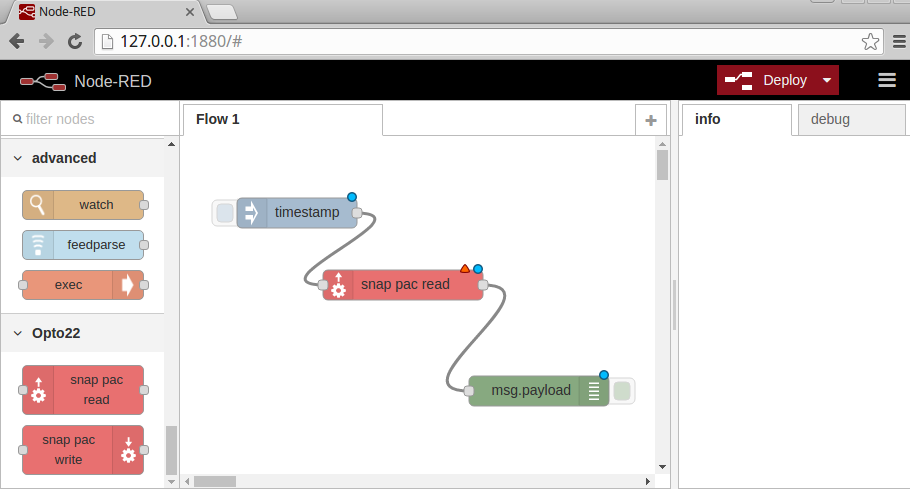
- Drag out an Inject node, a PAC Control Read node, and a Debug node.
- Wire them together, as shown below.
Step 2 - Configure the PAC Control Node
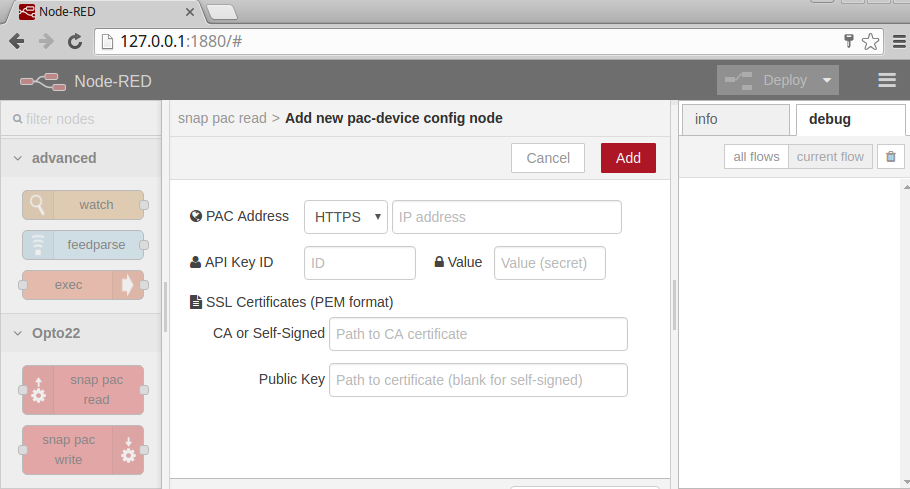
- Double-click the PAC Control Read node to open the Edit pac read node view. Since this is the first PAC Control node, a controller configuration must be added.
- Click the pencil icon to the right of the Device field to open the Edit pac-device node view.
- For the Address fields, select HTTPS or HTTP and enter the IP address of the controller.
- groov EPIC processors support HTTPS.
- SNAP PAC controllers support HTTPS and HTTP.
- Enter a REST API key in the API Key Name and Value fields.
- For groov EPIC, the API Key Name field should be left blank. In the API Key Value field, enter the API key of a groov user that has permission to the PAC Control REST API.
- For SNAP PAC, enter a PAC Control REST API key in the API Key ID and Value fields. The key should match one of the keys entered in the controller’s Authentication Key Management page, as described in Step 4 of the controller configuration section.
-
If using HTTPS, then also configure the SSL Certificates fields.
For SNAP PAC, more information on SSL certificates is available in the PAC security with Node-RED section.
IMPORTANT: The certificate files need to be on the same device or computer as the Node-RED installation, as it will open the certificate file directly from the file system.
- If using a self-signed certificate, then enter the certificate’s filename in the “CA or Self-Signed” field.
- groov EPIC: If using a groov EPIC processor to access another groov EPIC or SNAP PAC, upload the certificates with groov Manage, using the Security -> Client SSL page. Enter just the filenames here.
- groov Edge Appliance: If using a groov Edge Appliance, just enter the filename of a certificate you uploaded using Node-RED Admin.
- Computer: If using Node-RED on a computer, enter the path and filename of a certificate on the same computer.
- If using a CA-signed certificate, then enter the CA’s certificate’s filename in the “CA or Self-Signed” field and the controller’s public key in the “Public Key” field.
- groov EPIC: If using a groov EPIC processor, just enter the filenames of the certificates you uploaded using groov Manage.
- groov Edge Appliance: If using a groov Edge Appliance, just enter the filenames of the certificates you uploaded using Node-RED Admin.
- Computer: If using Node-RED on a computer, enter the path and filenames of the certificates on the same computer.
- If using a self-signed certificate, then enter the certificate’s filename in the “CA or Self-Signed” field.
- Click Done to return to the “Edit snap pac read node” view.
- Confirm that Data Type is set to Device Details.
- Click Done.
Step 3 - Deploy and Run
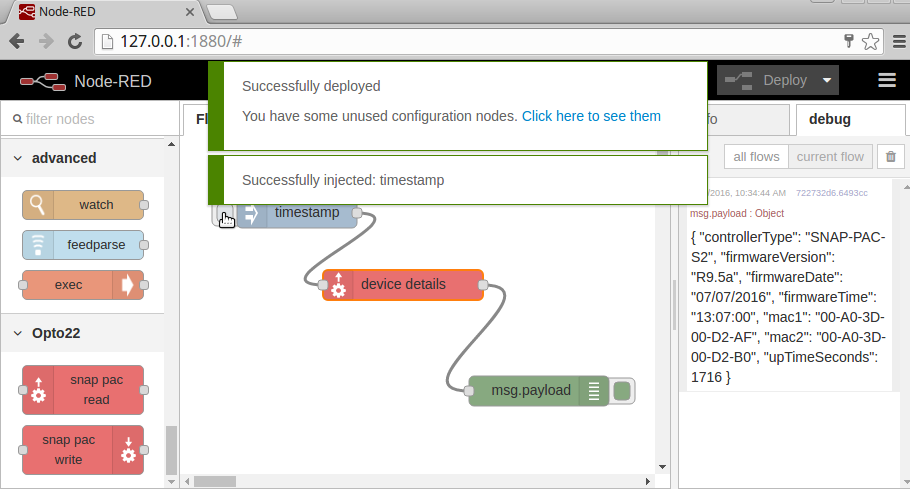
- Click Deploy.
- Make sure the Debug tab is viewable in the right-hand sidebar.
- Click the Inject node’s button.
-
The Debug tab should show a new message with details about the controller, such as the type of controller, firmware details, and MAC addresses.
For example, { “controllerType”: “SNAP-PAC-S2”, “firmwareVersion”: “R9.5a”, “firmwareDate”: “07/07/2016”, “firmwareTime”: “13:07:00”, “mac1”: “00-A0-3D-00-D2-AF”, “mac2”: “00-A0-3D-00-D2-B0”, “upTimeSeconds”: 1719 }. It’s printed out as JSON, but it’s a JavaScript object, and easily used by other nodes in the flow.
If that worked for you, then your Node-RED installation is successfully communicating with your controller!
Next Step
Continue on to reading strategy variables.